Search This Blog

Tuesday, December 27, 2011

introducing the Rutabega..


Was brought home some Rutabegas... (always think of a an old beat up car when I hear that word not sure exactly why and not curious enough to figure that out, either.)  Anyway, I am the girl who always gets the checkout clerk grabbing for the produce code book.. there are few vegetables in the store that don't frequent my cart.  But these.. this is a first. Not common around our house growing up.  They look kinda like a turnip so I thought oven roasting would be best for a 1st try.  
Tossed them with the usual olive oil and sprinkled on some garlic, onion powder and seasonings and turned them into oven fries.  And you know what?... pretty good.  Would actually make them again.  Scarlett ate those on her plate and they were a nice alternative side dish from potatoes or another starch.  
Rich in beta carotene, part of the cruciferous family of vegetables.. What does this matter, you ask?  Cruciferous vegetables have excellent cancer fighting properties. Research suggests that these cruciferous vegetables contain a kind of phytochemical known as isothiocyanates, which stimulate our bodies to break down potential carcinogens. They work by preventing the transformation of normal healthy cells into cancerous cells. Woot-woot!
And what I recently learned, Rutabegas are actually a great tasting vegetable with a delicate sweetness and flavor that hints of the light freshness of cabbage and turnip. I think next time, I will cut into cubes, roasted and then mix with some beets, potatoes and carrots... and simply season with salt and pepper.  They have a nice flavor that doesn't need to be masked.  But for a 1st try.. this oven fry rutabega recipe is great. Start here introducing yourself to another kid-friendly, yummy, super food!And, yes.. go ahead and serve them with ketchup.

Rutabega Oven Fries

  2 rutabegas, peeled and cut into fry size
  1 clove garlic, chopped
  2T. olive oil

In a small bowl mix together..
  1T. cornmeal
  2t. paprika
  1t. sea salt
  1/2t. fresh cracked black pepper
  2-3 T. Parmesan Reggiano grated cheese

In a large bowl toss fry-size rutabegas with chopped garlic and olive oil.  Sprinkle over spice mixture and toss til coated.  Place in a single layer on a baking sheet lined with foil and sprayed with a cooking spray.  Bake for 25 minutes, turning once with a spatula. (fork tender and outside is crispy-ish)

Saturday, December 17, 2011

Red ambition

Been looking for a new shade of me.. for a long time.  Love the blonde, but when winter comes.. I know I need to richen it up. Have always wanted to do a nice red.  Not the red, burgandy wines of my college years.. I was so whatever, nyc girl with a touch of goth.  Yep, that explains me.  

Enter Drew Barrymore's new commercial for some sort of product .. but who bothered to pay attention to that when all I could see was the perfect shade of my RED! 


and how!  Whatcha think?  Got an appointment on monday.. I'll let ya know how it goes.

Friday, December 16, 2011

simply kale

Big, leafy greens.. so good for you, but can be so intimidating.  Don't be afraid.  Try it, you might like it and the benefits are HUGE.   Here is my simple, basic way to cook kale for everyday cooking.  It is so yum this way, I actually crave it.  If you must... Garlic lovers: go ahead and add some chopped garlic to the oil and saute for a minute before adding the broth and kale.  Sauteing some onions doesn't hurt either, but again.. this is the basic and honestly, I love it in this simplicity.


  Simple Kale

  1 bag or bunch Kale, chopped
  2 T. Olive oil
  1 c. chicken or vegetable broth, preferably organic and low sodium

  In a large saucepan, heat 2 T. olive oil and add 1 cup of chicken broth.   Bring to almost a boil and add chopped kale.  Cover and cook for 5 minutes, til stems are tender. 

  Season with S+P, if you like. 

Results vary.  This you need to know.  Sometimes, I cook a pot of greens and I don't even need to add salt. They taste that good.  Sometimes, using the same technique.. a pot of greens taste really bitter.. or too uh, lets just say.. not-so-pleasantly-green.  But don't give up on 'em.. here are a few easy "fixes" that will remedy any not so yummy result. 

Try adding a splash of vinegar.  Balsalmic is a great choice and so is raw apple cider. 

Add some coconut milk or broth. This sweet, aromatic broth will curb the bitterness.  

Top with some stewed tomatoes.  This is my favorite remedy.  
Don't have any canned stewed tomatoes in the pantry?.. No worries, they are so easy to make.  Here's how:

Quick Stewed Tomatoes

Place one can of good quality tomatoes in a saucepan.  Add a good bit of dried basil, pinch of brown sugar (Raw sugar or honey will work as well) and 3-4 Tablespoons of butter.  Slowly simmer together.
voila.. stewed tomatoes. 
These are especially good on collards, a southern favorite.

Tuesday, December 13, 2011

There's no such thing as natural beauty. jerseylicious sugar plum cookies.

So, I saw these cookies on the internet. Yes, the lovely internet that never lies to you and always has perfectly correct recipes to share by simply download and bake. (can you hear the sarcasm?) 


cute, right? don't you want to make them right away? What?! No?! You're not from Jersey?! Oh.


Yes, yet another recipe that I tried off a blog that flopped and flopped big. Funny thing is 98.9% (yes, that is an exact percentage.. i am that calculated.)  of the time I check recipes against several similar, to ensure success. This time.. uh, I just didn't.  The bright pink girly cookies distracted this jersey girl, that's all I'll have to say.  Well, after altering the recipe.. by which I mean.. adding a full cup of flour more!.. they came out perfectly.  Anyway, these are so fun.. I will be making them again.  Next time in a bright fuchsia pink.  They are simply fabulous for a little girl's "Fancy-fancy" party or a boutique event.  
In the words of the immortal Truvy... "there's no such thing as natural beauty."  Enjoy these guilty pleasures..  very un-natural looking cookies! 

this photo shows lovely finished results..
after figuring out how to make this recipe work. read on. 


  Brightly Hued Jerseylicious Cookies
     
    1/2 cup unsalted butter, softened
    1/2 cup butter flavored shortening
    1 cup natural peanut butter (or whatever kind of pb you enjoy)
    1cup sugar
    1 cup light brown sugar
    4 tablespoons milk
    2 eggs
    1 t. vanilla extract
    3 1/2 cups all purpose flour
    1 1/2 teaspoon baking soda
    1 teaspoon baking powder
    Food colouring gel.. i suggest bright pink or purple

    Sanding sugar mixed with coloured sugar crystals (for added desired bling)
Preheat oven to 375º degrees.

Cream together the butter, shortening, and peanut butter, I used my trusty ol' stand mixer here.  Mix in sugars, egg, milk and vanilla. 

In a separate bowl, whisk together dry ingredients.  Add to wet mixture til just mixed. Don't overwork the dough.  

Add gel food colouring... a lot. Use a toothpick or skewer and add a good gob.  Mix together until you get a brighter than you think necessary hue. Then it's just right! 

Chill the dough for 15 minutes.  

I use a small ice-cream scoop.. which is the perfect 1" size. Roll the dough into approximately 1 inch balls.

Roll balls in mixture of sanding sugar and coloured sugar crystals. (I used raw sugar and purple crystal sanding sugar.. avail at supermarket)

Place on an ungreased cookie sheet or silpat,  at least 2 inches apart.  

Bake between 9 minutes.  Let cookies cool about 1 minute on the cookie sheet (but no more) before removing them to a cooling rack.

After cooling for 1 minute...  Immediately, deposit 1 HUGS striped kiss in the center, gently. Do not push down too much, it will melt through. 

Now run the cookies to a cool fridge (or if you have absolutely no fridge room.. to a dry spot outside or in the garage, if it is winter like it is here) 

The reason you do not want these cookies to sit in your warm kitchen after pushing a kiss on them.. is the kiss will then become molten and melt down into what looks like a demented nipple cookie.  Don't do this.. I did.. I learned and now I tell you. Seriously, if you don't add enough dye.. way more than you think necessary and then don't heed my take the cookies to cool quickly.. you end up with grey-ish demented nipple cookies. Not exactly what I was going for.  see photos of such disappointments.  

Now you know.. and when they work.. THEY are FUN!  SO, go ahead.. trust me and make some!


 THIS, is exactly what the internet will lead you to make. Demented grayish striped deflated nipple cookies. 


 Ok, remedy.  This is the hue you want your dough to look like. GRAPE! purpleicious! and no worries, those little white-ish flecks are the result of choosing chunkalicous peanut butter rather than (yawn) creamy.  But, no.. choose what you like. I won't judge you.


This is where you want the bling! Roll the purple balls in sanding sugar and crystal sugar, colour of your choice.


Puffy purpleicious mounds.. not flat (see photo of error above! grrr.)  Glistening with the "bling" of rolled sugar. 
sugar plum fairies do dance in our kitchen

This is a not so great picture of finished results using my recipe above.
Definitely worth the effort! 

Sunday, December 11, 2011

visions of sugar..ed globes of gumdrops, danced in her head..


I think Scarlett's favorite candy is gummies. You know, the really-get-stuck-in-your-2-year-old-teeth-that-you-always-fight-me-when-it's-time-to-brush-and-I-feel-we-never-do-a-good-enough-job-gumdrops and such. mommy stress much? yes. duh. 

So what's one to do when it's her 1st real Christmas that she is understanding...? Make ornaments studded with such pieces of heaven.  Yes, this is one of the ways I ensure her devout devotion to me! 

This project is simple.  Gumdrops (Trader Joe's has an awesome pack of pastel coloured but REAL fruit included ones) 
Styrofoam orbs
Toothpicks, cut in 1/2 


Simply take half toothpick and insert in gumdrop halfway.  Then insert said gumdrop into styrofoam orb. Continue round til you have studded the whole thing.  

To hang, use a heavy wire to poke straight through.  Twist wire so it doesn't lose it's place and gumdrop ball drop to the ground.  Which I am sure, is Scarlett's Christmas wish.  
at top of ball, twist wire into a loop and hang with ribbon.  

Fun, childlike, sugar-laced wonder... It's what christmas is all about.  At least at my house. 

  Or simply set the gumdrop balls on a table, like I lazily did here! This was my Christmas tea table that I decorated.  Using glass cake domes as little snowglobe inspired vignettes. I have a love affair with vintage painted wooden christmas ornaments from all over the world. The dishes are french china and for sale here on etsy.

Another idea, if I had time would be to stick a small dowel in them and place them in a little pot.. cover with snow.  Little gumdrop topiaries... this, i think would be cute lined up down the middle of a holiday table. Alright, convinced.. gonna try one. Will post image later!

vintage ornaments and frames as trays.. measuring cups from the 1930's double as votive holders.

Thursday, December 1, 2011

Chewy Chocolate Cookies


With the holidays and baking season upon us, these cookies are amazing just to have on hand and they package up beautifully for an easy, delicious last-minute gift, should you need one.  


Hershey's cocoa powder (unsweetened) works fine here if you don't have any dutch-processed cocoa powder on hand.  Use an ice cream scoop to scoop out the dough and roll into a ball in your palm, then drop into a sanding sugar..  Easy and the cookies come out very round and uniform. Meaning, perty! .. so don't forget to mention they are homemade to get some well-due credit!

(adapted from Martha Stewart Cookies)

Chewy Chocolate Cookies  

2 cups + 2 T. all-purpose flour
¾ cup unsweetened Dutch-process cocoa powder
1 teaspoon baking soda
½ teaspoon salt
1¼ cups (2½ sticks) unsalted butter, room temperature
 
2 cups granulated sugar
2 large eggs, room temperature
2 teaspoons vanilla extract
sanding sugar (I used organic sugar) for rolling


Directions:
Mix the dry ingredients in a bowl and set aside: flour, cocoa powder, baking soda and salt.


In the bowl of an electric mixer on medium speed beat the butter and sugar together until light and fluffy, about 2 minutes. Beat in the eggs and vanilla until combined, then reduce the mixer speed to low and slowly add in the flour mixture until just combined.


Form the dough into a disk and wrap with plastic wrap. Refrigerate until firm, about an hour.


Preheat the oven to 350°. Scoop the dough into 1¼ inch balls, drop and roll each ball in the sanding sugar.   I used an organic sugar which is slightly brown-hued..  the sugar comes out sparkling in the end.  Raw sugar would work well here, also.  
Place (with room to spread) on a cookie sheet lined with silpat or parchment paper. 

Bake for 10-12 minutes, or until the cookies are set. They will still look a bit gooey when removed from the oven. Cool on a wire rack for 5 minutes then remove from the cookie sheet and cool completely.


Tuesday, November 8, 2011

Recipe: Spiced Coffee


So, I put all this... 

1/2 t cinnamon + 1/4 t cloves + 1/4 t nutmeg + dash of allspice + 1 heaping teaspoon orange zest + the usual amount of freshly ground coffee

...into my french press this morning and came out with the most delicious coffee ever! (And this from someone who doesn't like any flavored coffee or creamers!!)

Tuesday, October 18, 2011

Turkey Bean Chili and master chef in training


Beans are a nutritional and healthy powerhouse.  duh.  This is nothing new.  Just happened upon Dr. Oz (ooh) the other day, who had an expert on his show talking about the benefits of red kidney and pinto beans..  their cancer fighting properties and how we should try to fit them in our diet as often as possible. So, I thought it was time to share my turkey chili recipe.   
This recipe is my go to for quick and easy (almost all pantry staples), comfort food that makes great left-overs and is just super delicious and healthy.  I feel good eating it and serving it up to my little one.  She loves her "ceci-ers" -pronounced cheechers (garbanzo beans) and "hot dog beans" (kidney).. and they are in there along with black beans and sometimes I even add cannelloni beans.  Beans, beans, beans, beans.  Basically, you can add more or less. I also love the addition of corn here, it not only adds a bit of colour in a dark bowl but it also adds the little bit of needed sweetness and even thickens it a bit. The cinnamon and cocoa may seem out of place here, but they aren't.  Try it.  They both add depth and richness of flavor and trust me, it does not scream "chocolate chili" when you're done.  
This chili does not need to be simmered all day, It can be eaten right away which is what I usually do and love about it.  However.. it can be partially cooked in the pan and then add all ingredients into a slow cooker and cooked on low til you get home or ready to serve.  It's easy, not fussy. I am making this chili more often in winter, heading for the pantry and most often, don't have fresh cilantro on hand.  I found these frozen cubes of cilantro (avail at Trader Joe's) and I love it.. Always have the basil and cilantro in the freezer.. and when I need it a cube or 2 delivers an amazing fresh taste of summer.  Good enough to make guacamole or salsa with. 

Turkey & Bean Chili 

   3 T. olive oil
   1 lb. ground turkey
   1 large onion, chopped
   2-3 cloves of garlic, chopped

   3/4 t. sea salt
   1/2 t. fresh ground pepper
   3 T. oregano
   2 t. cumin
   1 T. unsweetened cocoa (darker preferably) 
   1/4 t. cayenne pepper

   15 oz. can of diced tomatoes
    small can of green chilies chopped (not hot)
   1 cup of chicken stock

   can of black beans, drained and rinsed well
   can of red beans, drained and rinsed well
   can of ceci or garbanzo beans, drained and rinsed well
   can of creamed corn

toppings:
   red onion, chopped
   fresh cilantro, torn
   avocado, large dice
   sliced jalapeños
   sour cream 

1.  Heat 2 T. olive oil in large skillet or dutch oven on medium high. 
2.  Add ground turkey, breaking up with wooden spoon cook till no longer pink and barely done.
3.  Add onion and sauté 2 minutes with turkey meat. Push to the side of pan and drain any excessive liquid with a spoon. Add a glugg of olive oil, to empty side of pan. Add to it garlic and saute till just cooked, not brown, about 1-2 minutes.  Mix into meat/onion mixture.
4.  Turn down heat to low and stir in S+ P, oregano, cumin, cocoa and pepper. 
5.  Add tomatoes, chilies, chicken stock, beans and corn.  Simmer for 20 minutes.

Serve with toppings and cornbread.    
If you like spicy, chipotles in adobe sauce is my favorite heat to add. But it seems everyone around me is not into hot.. and with a little one, we are heat free nowadays.

Making it at Nana & Pop-pop's with my little 2 year old helper
She is fascinated with onion skin, no matter how hard I try to keep her away.

Getting the spices ready.. tap, tap, tap.


Seriously.  Stop touching the onions, already!

always likes to stack the cans


Her favorite part.. rinsing the beans.

Once the spices are added.. such great colour.

Adding chilies and tomatoes

and almost done.. yum!

Monday, September 5, 2011

Cinnamon Toast Muffins


Growing up it was so nice when mom would make cinnamon toast.  You know, wonder bread smeared with butter (probably margarine, who am I kidding) and then sprinkled generously with cinnamon sugar and set under the broiler til melty and toasty.  Nom.
Well, these muffins take me there.  A cross between cinnamon toast and a cinnamon sugar doughnut.

They are so simple and easy to make, so get up a half an hour before your guest.. and the aroma from these will have them thinking you live over a french patisserie! These are best fresh from the oven. Definitely not a bake ahead muffin, but don't worry.. they are quick and easy.

Now regarding nutritious.   I have tried these both ways.. white flour and with whole wheat white and whole wheat blend.  If they are all to be consumed the minute they are coming out of the oven.. then the whole wheat works fine.  But if they will sit any amount of time or you want to give them away .. the processed white flour works best here, as it is lighter and will deliver a tender baked good.   Your choice.  And should there be any leftovers, I suggest a quick warm in the toaster oven.. it's worth the minute spent.  

Cinnamon Toast Muffins

   1 1/2 c. AP flour (or whole wheat white)
   1 1/2 tsp. baking powder
   1/2 c. sugar
   1/2 tsp. salt
   1/4 tsp. nutmeg

   1/3 c. butter, melted
   1 egg (preferably room temperature)
   1/2 c. milk
   1 t. vanilla

Topping
   1/2 stick butter, melted
   1/2 c. sugar
   1 tsp. cinnamon

1. Pre-heat oven to 350º  Place liners in muffin tray or spray with cooking spray.  (Recipe makes approx. 10 large muffins)

2.  In a medium bowl, whisk together dry ingredients. Set aside.

3.  In another bowl whisk together egg, milk and vanilla.  Stir melted butter into flour and then add egg mixture into flour/butter mixture and stir till just combined. Nothing more! Over mixing will result in flat, heavy muffins.

4.  Fill muffin cups 2/3rd full using a large ice-cream scoop.

5.  Bake for 20-25 minutes for large muffins.  Cool on rack. 

Baked and waiting for topping.
6. Meanwhile make topping.. Melt butter in one dish and mix cinnamon sugar in another. 

7. When cool enough to handle.  Dip muffin in butter and then in cinnamon sugar. 


Enjoy!


Wednesday, May 4, 2011

Easy Salmon Dinner Packets

This is probably my go to when I gots NO time at all for dinner prep.  Super simple, fresh ingredients, pop in the oven (go do something else) and barely any clean up! Yet, this always impresses whomever I serve it to.  Healthy and delicious, almost becomes a bouillabaisse when it's done.

This is one of those.. what veggies do I have? or what looks fresh at the market meals.  Any combination will do.  They all bring something different to the dish.  And since everything steams in it's own juices...  in the end, the flavor of the broth depends on what you use.  
I change up according to what I have, but I always at least include onion, tomato, potato.  The onion cooks and adds a sweetness, the tomato whole shrivels and cooks in its own skin and adds so much fresh flavor.  (If your tomatoes are larger, add just a wedge or two.. it will cook down into the broth adding a lot of flavor.)   Corn on the cob cut in 1/4 pieces is yummy when in season.. and looks great when you open the package to serve.
So, go at it.. and find what your favorite is.  This is what I had on hand.  You also can vary the fish or add shrimp, scallops.. it all works pretty well.


folded parchment square into triangle


folded parchment w food placement... 


spinach bed on bottom, chunks of veggies
top with fish & drizzle with sauce
begin your fold and seal on the top right, fold top over and down, over and down...

keep folding and sealing.. make sure there are no gaps


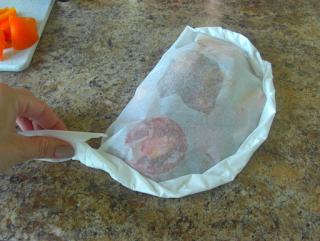
this is what the end result should look like.  Simply fold under the "tail"

Salmon Parchment packets

  Salmon fillets (wild Salmon, never farmed) single portion
  
  Fresh veggies..
Asparagus, Broccoli,  Red, Yellow or Orange Pepper, Tomato (large cherry or small roma) Sugar Snap Peas, Snow Peas or any green bean, Kale or Chard, Squash, Zucchini, Red potato (cut into no bigger than 1" pieces, this is what needs cooks the longest.. so keep it small) Red Onion (cut into large chunks and keep together) Corn on the Cob,   Carrots (I love the baby carrots for this... they are tender within the cooking time) Spinach (This wilts down to nothing, so add a lot more than you think) 


Simple Dressing.. (when you don't have any teriyaki or ready made on hand)
  • good drizzle of Olive Oil
  • 1 garlic clove, finely minced (opt)
  • Slice of fresh lemon for each packet
  • 1 pat of butter
  • fresh herbs.. anything works here or none at all.  I prefer parsley, basil, dill or thyme (especially lemon thyme) but whatever on hand. But believe me, not needed but I love to add when I have on hand!  
  •  S+P
  • On other occasions I add a teaspoon of miso paste & bit of honey, olive oil, S+P .. which makes a yummy quick miso glaze.  This I simple put a teaspoon or 2 on the fish directly.
Oven pre-heat to 375º f 

To assemble..
Large parchment square  Fold in half diagonally.  It is now a large triangle.  Place with fold at top and open.  Place an assortment of veggies on bottom half (towards the fold).  Give a good season with S + P.   Place salmon on bed of veggies & top with terriyaki or drizzle with olive oil, etc.  If adding lemon and fresh herbs, place on top of Salmon. 

Fold top back over.  Starting at the top right side, fold down bit of both parchment paper (top & bottom) creating a seal.. work your way around to the top left corner.  This will create a half moon shape.  Be careful to keep the paper sealed as you fold.  If you pack to much in or your paper is too small.. this will be an issue. In other words, don't chinz on the paper and watch your portion size!  When you arrive at the left top corner (the end)... just fold it under the packet.  Gently place the packet on a baking sheet.  Repeat. 

I flick the packets with a wee bit of water.. just a little with your wet fingers.  I don't know if this is necessary, but I do it.  Bake for 20-35 min depending on the thickness of your fish.   Remember, potato size is important.. if you want them to be tender.  More times than I'd like to admit.. rushing and the potatoes were a bit hard.  Packets might brown a bit, it's all good.  To serve, I find the easiest thing to do is when you place in a shallow bowl or dish, take your knife and make a slice underneath, leaving packets and contents intact.  Then your guest can remove and get the full impact of packet cuisine aroma. (and a free steam facial for that matter.) 

Tuesday, April 5, 2011

Broccoli Slaw


Been obsessed with broccoli and carrot slaw for over a year now.  It is a staple, I pretty much make it weekly.  Scarlett loves it, Nana loves and it's super, super easy to do.   I mean, you buy a ready-made bag of the broccoli & carrot slaw, add some dressing, sliced apples, dried cranberries and walnuts.  That's how we like it.  Sometimes I add fresh chopped cabbage, sometimes not.  The coleslaw dressing is adapted from several different recipes and finally to where I think it's perfection, hit of vinegar and hit of honey to sweeten just enough.  

But then, we were up in Edmonds, WA the other weekend.  We just got off the ferry and were looking for a place to eat. Well, I can't remember the name, but man, we lucked out.  Really good artisan-bistro food. My friend, Robbin, who was with us got a grilled 4-cheese sandwich and it was pretty amazing.  I ordered their broccoli slaw for Scarlett.. and it blew my socks off!  Inspired me to up the ante on my slaw.  A couple of additions... and we're now at pretty ah-mazing!   (If I do say so myself)  I liked the slaw before, now I am looking forward to it even more!

Health wise... it's hitting all the marks for me too.. especially if you don't drench the slaw.  Just use what you need. 


Broccoli Slaw


  • 1 package ready made Broccoli Slaw (we use trader joe's.. but you can find it at most stores near the cabbage slaw area of the produce section)
  • 1-2 apples, large diced
  • 1 sm to med red onion, diced small
  • 1 cup broccoli crowns, cut into small pieces (discard or save stalks for soup)
  • 1 cup dried cranberries
  • 1/2 cup chopped walnuts
  • 1/4 cup shelled sunflower seeds

Simple Coleslaw dressing
  • 3 T. plain yogurt (We refer Greek full fat)
  • 3 T. mayo (I use the olive oil mayo.. but any will do. Veganaise works well too)
  • 2 t. dijon mustard
  • 2 t. apple cider vinegar
  • 1-2 t. honey (agave syrup works if you're watching sugar intake) 
  • 1 t. celery seed
  •  S+P
Whisk all dressing ingredients together.  Taste for seasoning.   

Pour over and toss with other ingredients.  Let sit in fridge at least 1/2 hour before serving. 


Perfect dish for summer which is right around the corner!  Nice and cool.