Search This Blog

Thursday, August 30, 2012

"Nobody bakes a cake as tasty as Tasty Kakes"


...Who knows that jingle?  Bets are if you immediately think of the oh-so-yummy Butterscotch Krimpets or the peanut butter Kandy Kakes that were often packed in lunchboxes, you must have spent some childhood time on the east coast, especially the tri-state area.  Made in Pennsylvania since 1914.. they are still made there today.  
But my life is 3000 miles away right now. 

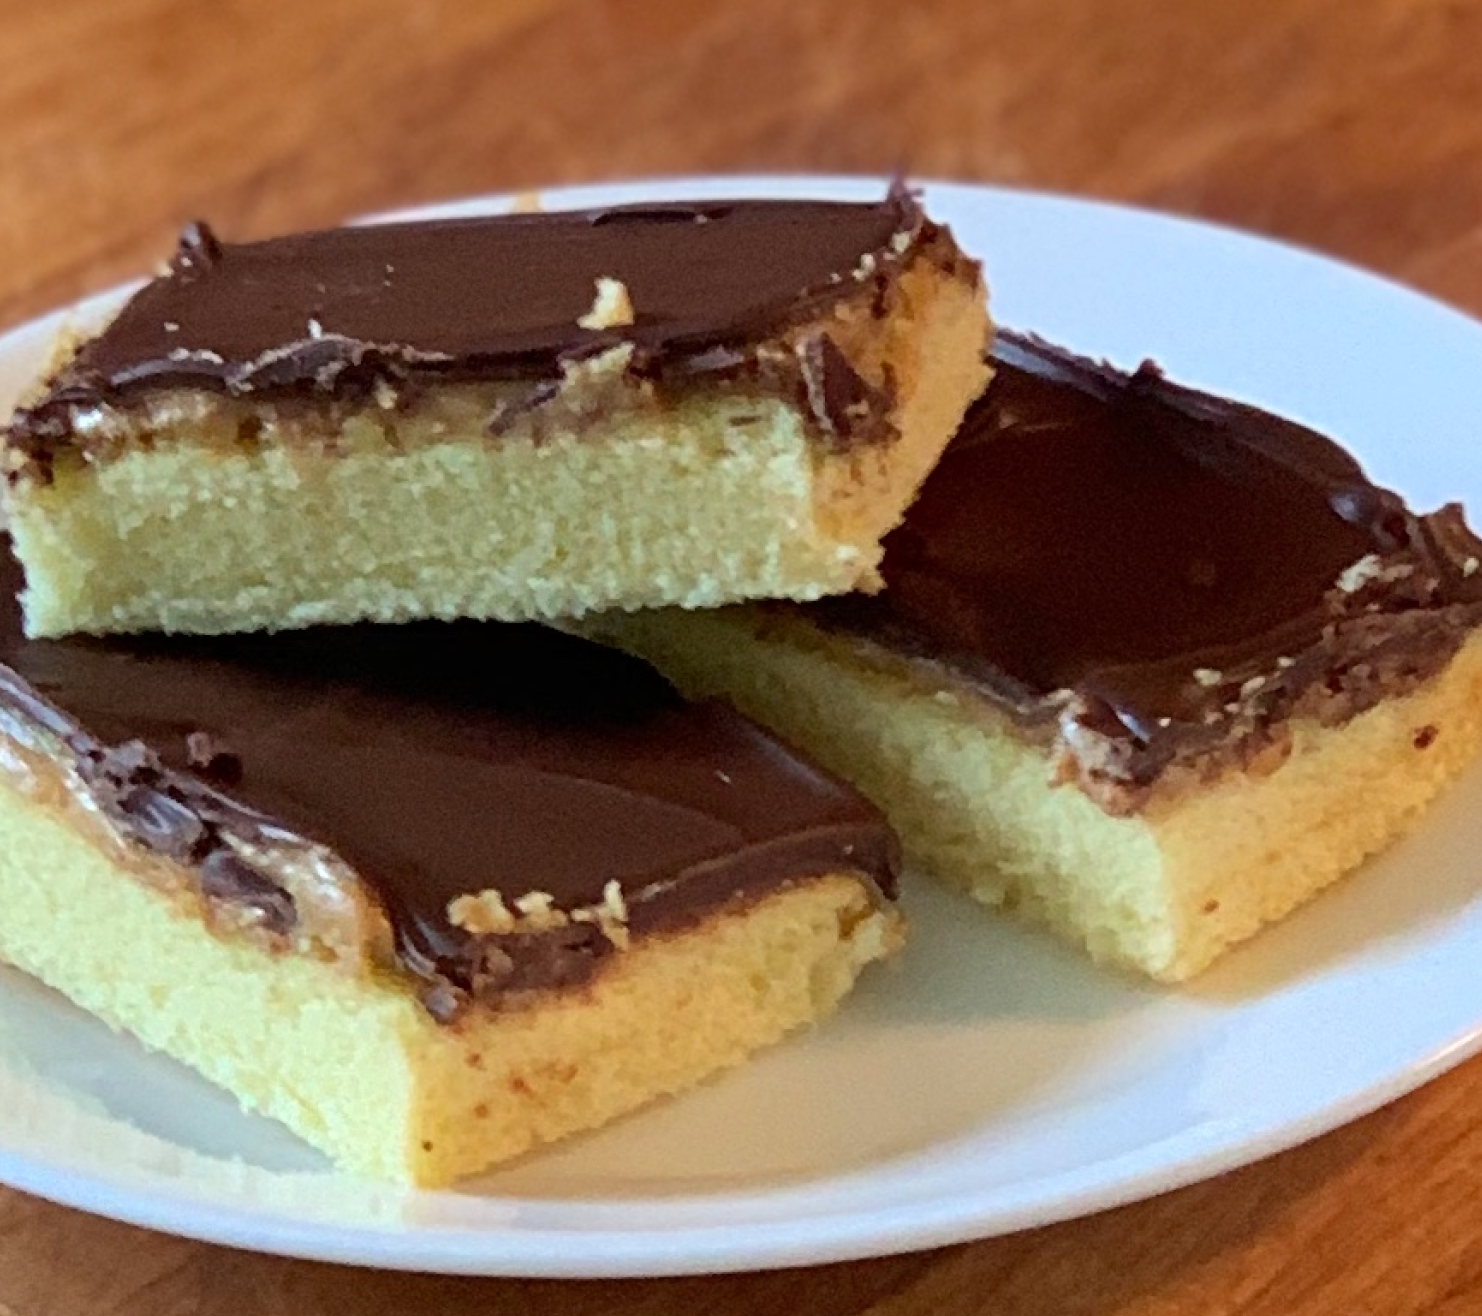
However, lucky me.. I can make TastyKakes whenever I want!  Thanks to a copycat recipe that I got from Gourmet Magazine years ago.  And, honestly.. they are better.  The cake is very light and moist, delicate vanilla and the peanut butter layer, oh so good especially when topped with a delicious layer of candy chocolate that snaps when you bite into it.  Very satisfying.  Cake, chocolate and peanut butter.. well, duh.

The recipe is easy to make and a kid fav...  I have tried these with almond and cashew  butter and it works well, too but it's the original flavor I am going after.  Peanut butter is best, that's probably the sentimental part.   And thankfully,  my little one has out-grown her peanut allergy but I still insist here on organic peanut butter.  The main reason for increase in peanut allergies in children over the last 10-20 years, is due majorly to the pesticides used on the peanut crops.  So, it's best to just keep to organic but don't use a "natural" peanut butter..  this needs your basic creamy, processed nut butter like those we grew up with, it really needs to spread easily and be smooth.  

A note when making these... after you spread the chocolate layer, you must score the cake into the portions before you refrigerate otherwise the chocolate layer will crack and break all crazy once it hardens.  


Peanut Butter Tasty Kakes

(from Gourmet magazine)
 

For cake:
4 large eggs, room temperature
2 cups sugar
1 tsp vanilla extract
1 cup milk
2 tbsp butter
2 cups all-purpose flour
1 tsp baking powder

For topping:
1 1/3-1 1/2 c. organic creamy peanut butter (do not use a "natural" kind)
1 pound chocolate, chopped (or morsels will do)


Preheat oven to 350º F.   
Butter and flour a 17x11 1/2x1-in. jelly-roll pan, knocking out excess flour.

In a large bowl, using an electric or stand mixer, beat together eggs and sugar until thick and pale, 3-5 minutes. Beat in vanilla.
 

While that is beating (or before, if you're not using a stand mixer), heat milk and butter in a small saucepan or in the microwave until the butter has just melted and the milk is steaming, but not boiling. Set aside.
 

Sift flour and baking powder into the beaten egg mixture and beat until just combined. With the mixer running, slowly stream in the milk/butter mixture until just combined.
 

Pour batter into prepared pan, spreading it out evenly, and bake for 20-25 minutes at 350º F. 
Cake is done when a tester comes out clean and the top is golden and springs back when touched lightly.

Let cool on a wire rack for 5 minutes, then place small dollops of peanut butter on the surface of the cake. Use an off-set spatula to spread the peanut butter into an even layer, covering the entire cake.
Let cool completely, then refrigerate for 1-2 hours to make sure the peanut butter is set.

When chilled, melt the chocolate in a double boiler (bowl over a pan of simmering water), stirring constantly. Once it is smooth, pour it over the chilled cake and spread it evenly with an offset spatula.
Using a knife, cut the cake into 30 bars. It is not necessary to cut all the way through the cake, just into the chocolate/pb layers. Make sure the cuts are clear, so wipe your knife in between each. This will make it easy to divide up the bars when the chocolate has set.
Return cake to fridge and chill until chocolate is firm (or overnight).

Makes 30 bars.


Wednesday, August 29, 2012

Chocolate Raspberries

Nothing better than simplicity.  This might just be it.  Dark chocolate chips tuck perfectly into fresh raspberries. Yum.


Tuesday, August 28, 2012

Peanut Soba Noodles


Peanut Soba Noodles.  The 1st time I had these, I fell in love and then attempted any and every recipe for them out there, starting with Nigella Lawson's.  Hers was very easy and non-fussy.. but I wanted more punch and more veggies. Finally, this is what I landed on and has been my go-to for several years.   
Cooks notes:  I prefer to use a hand immersion blender, It's quick, easy and hardly any clean-up.  If you don't have one, use a blender or a small processor. Using a processor or blender makes prep a lot easier.  Then I don't have to chop the garlic or anything that fine. 
Fresh ingredients make this dish. Lime, ginger, garlic, cilantro.. don't substitute.  Health benefits come with using fresh ginger and garlic, that you do not get from dried. Speaking of health benefits.. Buckwheat Soba noodles are a really good choice when it comes to carbs. But you could use cellophane, rice, yam noodles.. 

The Notable Nutrients in Soba

Nutritionally buckwheat provides vitamins B1 and B2, several minerals, and nearly twice the amount of proteins found in rice.  Rutin, a kind of bioflavonoid that includes the catechins of green tea and the polyphenols of red wine, is not found in other grains or beans, but is contained in great quantity in buckwheat.  This bioflavonoid strengthens capillaries and so helps people suffering from arteriosclerosis and high blood pressure. Recent studies indicate that rutin is also a powerful antioxidant that fights free radicals, which are responsible for many cancers.

Health Benefits of Buckwheat

Buckwheat also contains choline.  Choline, a compound in the vitamin B complex that plays an important role in metabolism, lowers blood pressure, and decreases cholesterol.
The following is the summary of the major health benefits of buckwheat.
Decreases cholesterol
Lowers blood pressure
Reduces fat accumulation
Promotes healthy bowel movements
Fits a well-balanced and low-calorie diet
Wow!.. Right?  That's why it is listed as one of the super foods! You can feel really good about this dish.  Hope you try this and like it as much as I do! Enjoy~

Peanut Soba Noodles

1pkg. soba (buckwheat) noodles
  cook as directed, set in ice bath or run under cold water and drain, set aside.

For PEANUT SAUCE:

Mix together using a hand or stand blender or processor :
1/3 c. soy sauce (low sodium), Tamari or Coconut Aminos 
2 to 4 T. peanut butter (crunchy, creamy.. your choice.)  
1 T. sesame oil (if you like spicy, use hot sesame oil)
1 T. water 
1 t. ginger, freshly grated 
juice of 1 lime  
1 small clove of garlic, minced 
spicy sesame oil (if you like heat and to taste) 
1 t. honey (optional) 
Siracha (optional for added heat)
               

Toss with noodles.  If too thick add a tablespoon more of water, til desired consistency.  Chill noodles with sauce in fridge while you prepare veggies.

Add:

1 red pepper, thinly sliced   
bunch of fresh cilantro, chopped
1 carrot, julienned 
1 cucumber, cut in half lengthwise twice & slice thick
1 cup of red cabbage, sliced thinly or shredded   
green onion, chopped.. finish with this on top 
sesame seeds  (Lightly toasted in a hot pan along with sesame seeds -watch carefully, so not to burn)  
Lastly add chopped peanuts right before serving (otherwise they get mushy)

optional - 
Depending on my mood, I add whatever other vegetable I have on hand... 
sugar snap peas or snow peas  
beet, julienned  
These I cook til tender crisp and blanch.*  Be sure not to overcook.. mushy or even cooked veggies would not be good here. The veggies should still have bite, so just a minute or 2 depending on how small you cut them. 
broccoli
asparagus
...   Eat cold or hot.   
Let sit at least 20 minutes dressed before serving.  The flavors get better as it sits. 
Cooked Chicken or shrimp added can make these noodles a complete meal. 
*Blanching simply means to have a large bowl filled with icy cold water ready when you are steaming your veggies. When they are done, scoop them out and right into the water to stop the cooking immediately.  That is how you get perfectly tender crisp veggies.    

Monday, August 20, 2012

Succulent garden gift

If you know me at all, you know I have a deep love for vintage and anything beautiful.  I have several mismatched or chipped odd china pieces that I use to hold earrings, keys, crayons, q-tips.. whatever.. It makes me happy to have them around. 
I have had this beautiful Rose piece of china set for quite some time.  I always envisioned it next to a bath holding lavender soap and some white washcloths rolled-up.  However, my bath right now is not a safe place for a lovely piece of china.. it is a haven for tinker bells, bubble potions and all sorts of 3-year-old fancies.  No spot for this.   So it has set, waiting.. for a use.  
Well, I also have a love of gardening and succulents.  I have seen several arrangements of the plants in a modern or minimal bowl as a centerpiece on a table and I always had this back in my mind to do in this shallow casserole. Finally, needing a gift and finding succulents on sale at a local shop.. I thought I'd give it a go.  It turned out pretty fab.. I almost kept it for myself.  


Step #1 Gather all ingredients.. small succulents & cacti work well together. I also chose a white decorative sand/small gravel.  The sand needs to be rinsed well before using.  Choose a  lovely shallow dish, deep enough to plant the little plants with just a bit of room as not to over-crowd. An antique serving dish, like this Haviland Rose is perfect for a little succulent/cacti garden.

 Step #2  Place plants, with the soil they came with, into the dish.  Using a spoon or small shovel fill in the space with the white gravel, which is moist from rinsing. 

Step #3  Using a funnel top the entire surface, covering all dirt with dry white gravel, this gives it a clean fresh finished look. 

Voila! I love how the succulents look in the dish. Soft and lovely.


Couldn't stop there.. this soft and lovely pink stoneware bowl is just perfect for this larger succulent. The softness of both would make this a lovely baby shower gift for a nursery. 


 My little happy helper.